Showing posts with label peas. Show all posts

July 25, 2014

Green Pea Hummus

DSC_0444

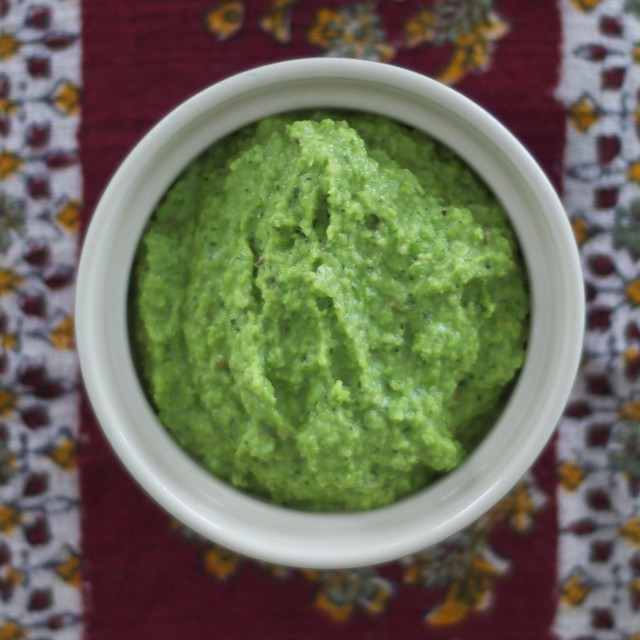
Look at this pretty pea hummus! It tastes like peas smashed together with mint and thyme.

Last year, I bought The Southern Vegetarian cookbook after being smitten with the Chubby Vegetarian blog. Both the cookbook and the blog are written and maintained by Justin Fox Burks and Amy Lawrence. Their cooking stuck with me because 1) they have upgraded and vegefied southern foods, and 2) they build foods around plant-based, un-processed foods. Some of my favorites from their book: andouille eggplant, mushroom meat, okra fritters, unchicken pot pie, and green pea hummus.

This green pea hummus is a slight adaptation from the recipe in their cookbook. I added ajwain seeds and fresh mint. The thyme-like flavor of the ajwain seeds pairs nicely with the cumin and coriander. The mint brightens up the peas - and I like it better than parsley. The pea hummus will last up to a week in the fridge. I served this hummus along with cucumber and radish slices. It's also very good on crunchy pita bread, or papaddums.

Green Pea Hummus
Recipe adapted from The Southern Vegetarian's Green Pea Hummus
Yield: About 1 and 1/2 cups hummus

Ingredients:
1/2 tsp ajwain seeds (optional)
1 tsp cumin seeds
1 tsp coriander seeds
4 tbsp olive oil
3 garlic cloves, smashed
1 16 oz package or 2 cups frozen green peas
zest of 1 lemon
1/4 cup flat-leaf parsley, fresh
1/4 cup mint, fresh
1/2 tsp salt

Directions:
Step 1: Dump the frozen peas into a colander and rinse with water. This should bring them up to room temperature. No need to cook the peas. Set them aside until ready to use.

Step 2: In a skillet, add the whole seeds and toast until fragrant about 5-6 minutes. Once toasted remove the seeds to a mortar and pestle or spice grinder, and grind to a fluffy finish. To the skillet warm the olive oil and then add the garlic. Cook the garlic just until it gets golden and smells lovely. If it burns, it will give off bitterness in the finished dish. Turn the heat off and remove the pan from the heat.

Step 3: Get out the food processor and prepare the processor with the large mixing blade. Add the peas to the work bowl of the food processor, and then add the olive oil and garlic, ground spices, 1/2 tsp salt, lemon zest, parsley and mint. Blend together until light and fluffy. Taste and adjust for salt.

July 10, 2011

Risotto with spring veggies and roquefort

Spring vegetables based risotto with roquefort cheese
Risotto with spring veggies and roquefort cheese

Risotto uses arborio rice, a short-grain starchy rice, is usually cooked with onion, garlic, a little oil and wine, broth, and is made into creamy deliciousness with either cheese, cream, or butter. 

Risotto is made by cooking onions or garlic in olive oil until fragrant. The rice is added shortly after and stirred around in the onion-oil mixture until well coated. A few splashes of wine or vinegar are added before broth is added. While cooking, the rice is stirred frequently, and broth is added in small increments every 5-7 minutes. Ingredients such as cream, cheese, or butter can be added in the last 5 minutes of cooking. 

If adding vegetables, peas or fresh herbs, can be stirred in 5 minutes before serving, others such as the broccoli or any other vegetables that will release water, should be cooked ahead of time and stirred in just before serving. I'll call these last minute ingredients in the directions below. The final dish should be creamy and removed from the heat because carry-over cooking will continue to cook the rice.

The broccoli, peas, snow peas, and thyme came out of the garden (spring risotto in July). These are the garden goods the first week of July. 

Risotto with spring veggies and roquefort
Yield: 6 servings, ~1 cup each
For the rice:
1 tbsp olive oil
1 large onion, diced
1/4 cup of white wine, or 1 tbsp white wine vinegar
1 and 1/2 cups arborio rice
6 cups vegetable broth
1/2 cup parmesan shredded
3-4 tbsp roquefort cheese, chopped coarsely
1 tbsp cold butter, or 1-2 tbsp cream

Last minute ingredients:
1 head broccoli, cooked and chopped (butternut squash, zucchini, or mushrooms could work too)
1 and 1/2 tsp fresh thyme, or 1 tbsp dried
1/2 cup peas (fresh or frozen)
1 cup snow peas (stir fried on very high heat for 1-2 minutes)
Fresh thyme sprigs or pea shoots for garnish

Directions:
  1. Heat up 6 cups of water or broth in a separate pot and keep warm.
  2. Heat up the olive oil in a large soup stock pot over medium heat. Once hot, add in onions and cook until fragrant, about 5-7 minutes, but don't let the onions brown. Add in rice and stir everything together to coat the rice.
  3. Add in wine and stir everything together, until it cooks down and the wine has cooked off. Add in about 1 cup broth and stir frequently and gently. You'll continue to add in broth in 1/2 cup increments letting the risotto cook down a little before adding the next 1/2 cup. When you've got 1 cup of broth remaining start getting the last minute ingredients ready.
  4. Add in peas and thyme. Add in 1/2 cup more of broth with broccoli. When the last of the water has been added and the risotto is beginning to thicken and look creamy and done, stir in the cheeses and butter (or cream if using). Stir together nicely and season with fresh pepper. Note, because roquefort and parmesan cheeses are salty enough, I didn't add any extra salt.
  5. Ladle into bowls or plates top with stir-fried snow peas and garnish with fresh pea shoots (or extra sprigs of thyme).

June 23, 2010

Baked Samosas


It was torture. First, the smell of these baking, then you pull them out of the oven (at least 5 minutes went in taking some pics), then within 30 minutes nearly all of them (well, 6 out of 8), gone. Devoured. I will probably never try and find another samosa recipe after this.  It was that good.  It's also a lot healthier than fried samosas, so you can feel entitled to eat nearly all of them.  It takes about 2 hours start to finish.

I blame (I think, I mean thank) Sara. While she was visiting we found a market here that sells prepared samosas. So we went there twice, and also bought some frozen ones from another market.  The prepared samosas look on and off.  The first time, they looked appetizing, the next, they looked stale and oily.  I knew I had to find a fix. Today, after sending off a job application, I settled in for some samosa searching.

I found an absolutely fantastic recipe with instructions from Aarti Paarti
(she is also a contestant on the Next Food Network Star)
Her video instructions were really easy to follow, illustrating how to make the dough and put together all the ingredients.

2 quirks: For the dough, I wanted a whole-grain or whole-wheat crust, so I used a whole-wheat flour instead. I didn't have buttermilk on hand, so I used yogurt.   Next, I don't cook meat so I tried my best to use the ingredients I had on hand to match her deliciously awesome recipe.

Samosa Dough:
Follow her directions but with 1/2 cup whole-wheat flour instead of all-purpose. I kept the pastry flour, because I'm convinced it makes the dough supple.

Samosa stuffing:
Now this is where I am deviating, but I think it's a nice adaptation. The spicy filling holds up well to the nutty dough.

1 large baking potato, scrubbed and washed (I left it unpeeled)
1/2 cup apricot preserves
1 tsp cumin
1 T smoked Spanish paprika
1 T Thai chili sauce
zest of 1 lime
juice of 1/2 of a lime
1/2 tsp salt
1/4 tsp pepper
1/2 tsp cumin seeds
1/2 cup peas, frozen
1/4 cup chopped cilantro

1. Boil the potato while you make the dough.
2. While the dough is resting you can smash the potato and add in the other ingredients, stirring in the 1/2 cup of peas and cilantro last.
3. Set aside and start rolling out the dough (back to her directions).

March 11, 2010

Verjaardag!

For the hubbies birthday I tried my hand at some very yummy Indian dishes: cabbage kofta, mushroom and peas curry and some fresh naan. The naan is remarkably easy to make as long as you give it enough time to rise. Links for recipes are below photos (they include video instructions too).


Cabbage Kofta from Vah Chef (above)

Mushroom and Peas Curry from Manjula's Kitchen


December 4, 2009

Samosa Puffs

Samosa inside, but phyllo outside. The puffs are made up of layers of phyllo dough, which are cut into squares and placed inside a muffin pan, filled with samosa stuffing, and then baked. Prepare the samosa stuffing first, and then the phyllo dough. It should take you about 2 hours from start to finish. Pre-boil the potatoes to reduce prep time.


You'll need a muffin pan, a pizza cutter, cooking spray or a pastry brush, and various pots and pans. Make sure the phyllo has been thawed in the fridge.

Ingredients:

Samosa stuffing:
4 baking potatoes, scrubbed, and cut into large chunks
1 liter water
1 T vegetable oil
1 tsp cumin seeds
1 white onion, chopped
4 cloves garlic, chopped
1 inch ginger, peeled and chopped (about 2 T ginger)
1 jalapeno, chopped
1 cup frozen peas
2 tsp garam masala
1/2 tsp turmeric
few cracks black pepper (1/4 tsp)
3 T cumin
1 tsp salt
1/2 cup cashews, toasted
1/2 tsp chili pepper
juice from 1 lime (or lemon if you have)
Directions:
  1. Preheat oven to 300.
  2. Roast cashews for about 10 minutes, until golden.
  3. Boil the potatoes and water, for about 30 minutes, or until soft. Drain all but 1/2 cup of the cooking water, and mash the potatoes while still hot. Add in small amounts of the cooking water if the potatoes are too dry.
  4. Heat the oil in a large pot, and add the cumin seeds, fry until aromatic.
  5. Add in onion, garlic, ginger, and jalapenos and cook 8 minutes. Add in salt, cumin, garam masala, turmeric, and chili pepper.
  6. Add in peas and saute.
  7. Add in mashed potatoes, cracked black pepper, lime juice and combine well. If the potatoes are too sticky add in a little water and mix.
  8. Taste to adjust for seasoning, and add in cashews. Turn off the heat once combined and set aside if prepping the phyllo.

Phyllo ingredients:
1/2 cup butter
8 phyllo sheets
Directions:
  1. Heat butter in a small saucepan, until melted.
  2. Heat oven to 350.
  3. Lightly grease a muffin pan and set aside.
  4. Arrange phyllo on a large jelly roll pan and cover with a damp towel to avoid drying out. You will be arranging 4 layers on top of each other. Phyllo is gentle and can break easily, so just be gentle with the moving. As long as the phyllo stays damp it will not dry out and will be easy to work with.
  5. On a clean kitchen counter, lay out a single sheet of phyllo dough, and with a pastry brush lightly coat the surface with butter. Repeat with remaining 3 sheets.
  6. Next, take a pizza cutter and score lengthwise about 4 times, creating columns that are about 2-3" wide. Next score widthwise, about 3 times, creating rows that are 2-3" wide. This will leave you with about 12 squares.
  7. Arrange squares in the muffin pan so that a nice mold is created, until all 12 are arranged.
  8. Next fill each with about 2 T of stuffing.
  9. Bake in the oven for 15 minutes, until golden.
  10. Serve right from the oven with some cilantro chutney or mango chutney.