Showing posts with label cooking resources. Show all posts

May 9, 2014

Za'atar in spice jars

DSC_0814

DSC_0782

DSC_0804

DSC_0770

DSC_0764

DSC_0820

I hoard spices. I do. Every so often, I set out to make spice mixes. Recently, I picked up Bryant Terry's new cookbook: Afro-Vegan. The cookbook is awesome. I've already bookmarked many recipes. This is an example of one of six dry spice blends featured in the book. Earlier this week, I took out my big box of spices and set out to make za'atar and blackened seasoning. Za'atar is a Middle Eastern spice blend of thyme, oregano, and sumac. The sumac gives it tang. Terry's book is loaded with many song recommendations; they accompany the title on each page. After reading through Afro-Vegan,  I went and found the playlist on Spotify. Then, I hit play, and got to work. 

With Mother's Day coming up, I thought this would make a nice gift for mom (or a great Father's Day gift, or really - any occasion). I repurposed some old spice jars, and used a stamp and paper to make labels. The labels are just strips of nicer paper cut to about 1.75" (4.5 cm) wide by 5.5" (14 cm) long. I hoard stamps too, and liked this "Destination" stamp as a label for the contents and the date. I wrote the ingredients on the side. Once the labels are ready, I affixed the labels to the jar with clear packaging tape. 

I like to use za'atar on pita bread. Coat the pita bread with a bit of olive oil and salt. Sprinkle on the za'atar and toast until just barely crispy. In high school, I used to baby sit and tutor for a Lebanese family. They always served me this in the mornings. I can still remember getting a steamy thick small coffee and pita bread with za'atar. In the past, I've used za'atar in spinach veggie burgers, on roasted potatoes, over a sunny-side up egg, and for tofu kebab skewers. 

Za'atar
Recipe from Bryant Terry's Afro-Vegan cookbook.
Yield: about 4.5 oz, or enough to fill up 2 spice jars

Ingredients:
3 tbsp dried thyme
2 tbsp dried oregano
1 tbsp sumac
1 tsp cumin seeds, ground
1 tbsp sesame seeds (I used a mixture of black and white seeds)
ground black pepper

Directions:
Toast the cumin and sesame seeds. Once hot add them to a bowl and let them cool off slightly. To the same bowl add all of the herbs and black pepper. Grind them in a spice grinder or a mortar and pestle. Store in an airtight container, away from direct sunlight, or refrigerate.  

May 1, 2012

May MoMe

In the spirit of moving and relocation here is May's Month of Meals.

Week 1 is brought to you by Neil. I've spent the better part of my life lecturing Neil on how and what to eat. His creativity impresses and inspires me. For someone that could easily eat out all the time, his choices to prepare foods at home impresses. I'm proud of you Neil.

I highly recommend the pizza method. To go with all the falafel that keeps showing up on month after month of meals we started baking our own pita bread around here. Oh, and go and check out my friend Stephanie's awesome Etsy shop.

April 1, 2012

April MoMe

Here's April's Month of Meals.

Here's a screen grab, hit the link above for the online doc.

Last month was mixed in with half the meals featured for April and last month's. I like the variety. I hope you do too. April's MoMe has many unlinked meals. Many meals have been thrown together without needing a recipe. Here are my thoughts/approaches on it, numbers coordinate with meals on the shared monthly meals:

2. Asparagus frittata; I use a recipe from my Deborah Madison cookbook which I've never blogged. Any frittata recipe that you like would be good. I finish some of it on the stovetop then put it in the oven to finish. Here's what it has looked like:
DSC_0123

6. Moroccan tagine with baked eggplant slices. There are a lot of good tagine recipes online. I like lots of veggies and beans served over rice or couscous. It just depends on what I have on hand. Slice eggplants lengthwise, drizzle with oil, and sprinkle with cumin, mint, and salt (I was gifted with a lovely Moroccan spice blend) and those are the main flavors. You can bake the tagine and eggplant at the same time. I love multi-tasking.

7. Pan-seared portobellos with wilted garlic spinach and goat cheese. Another throwing it together meal. I marinaded portobellos in balsamic vinegar and olive oil. I put them on a hot cast-iron pan. Meanwhile, I wilt down washed spinach and chop up garlic. As soon as the mushrooms are done cooking (reduced, cooked, and looking nicely sauteed) I throw in the garlic to soak up the sauce and cook the garlic a bit. Serve the mushrooms with some spinach and goat cheese. Easy!

12.  Beets in brown-butter sauce with chard-mushroom cream pasta. I made this dish from a variation of the link I posted along with it. For the beets, I browned butter, set it aside once it was done, and cubed up some beets and cooked them on low-medium heat in a cast iron while I assembled the pasta. It took a lot longer because of prepping the chard and mushroom. A fancy meal, give yourself an hour:
DSC_0217

13. Oven-eggs with oats and mustardy brussels sprouts. Oats are so good when served savory. In oven-proof custard cups, drizzle a bit of olive oil and crack an egg on top; crumble blue cheese on top, and top with tomato sauce or salsa. Place in oven while sprouts are cooking at 220º C/ 420º F; cook up some plain oatmeal. Serve the egg on top with everything. Clean and quarter Brussels sprouts. Place them in a pan with an almost naked drizzle of olive oil. Bake them along with the custard cups (props if you can use the same pan). Stir together a bit of olive oil, white wine vinegar and some water, and add capers and mustard. Roast the brussels sprouts  for 20 minutes and then cover with mustard sauce, continue cooking 10 minutes. Whole grains. check. Veggies, check, healthy protein, check. Minimal processed foods, check.

15. Stuffed bell peppers. One of five of Karlos' signature dishes. This turns out so good each time. He stir fries onions, mushrooms, garlic, and whatever we have on hand. He seasons with Indian spices, sometimes Italian, and this time with Moroccan spices. He adds beans to the mixture and smashes everything together with cream cheese or sour cream. He spoons them into cut bell peppers and bakes them. He cooks rice while the bell peppers bake (about 40 minutes baking at 180º C/ 350ºF). Prep usually takes 15 minutes or less.

17. Eggie sammiches. I hardboil 6 eggs, peel them once cool, and dump them into a bowl. To this bowl I add yogurt (I never ever add mayo, this is just how I roll), mustard, chopped capers, green onions or red onions, salt and pepper, and finely minced parsley. Mash, mash, taste, adjust, and serve.

20. Semi-sunny side up eggs. I hate runny yolks. Heat up some olive oil in a cast-iron pan. To the pan add chopped herbs, and red chili flakes, and some fresh or dried garlic. Crack the eggs on top of the herbs. Season with fresh pepper. Turn the heat to low and let the eggs cook until the yolks begin to get the white coating on top. Sprinkle with some water. Add whole cherry tomatoes to the pan, and cover for as long until the yolks set. I flip them, but you don't have too. Serve on top of toasted whole grain bread along with the hot tomatoes.

February 29, 2012

March MoMe


Here is the Month of Meals for March. I'm sorry the links for the png below won't load! =/ They are active on the pdf version.

I’ve gotten a lot of positive feedback from my friends that have used this and they often remark that I’m  organized to plan things for an entire month. I would like confess that although I use this as a framework for meals, I often venture out and try new things, and switch up meals regularly. The grocery lists help me to buy things and make healthy meals. So, Holly, use this as a tool for long-term planning, and feel free to deviate from it.

Personally, while I have used this it’s helped me see how much cheese I eat! While I certainly love cheese, I do think about it as a food to enjoy sparingly because of it’s high saturated fat content. With many cheeses I think less is more, and being in Europe, I love trying out new cheeses. Even the store brand feta cheese (a sheep’s milk cheese) is delicious and rich, and I need a lot less of it.

We started eating more quinoa and plattekeis (or fromage blanc, a creamy non-sour sour cream-like dairy product). Quinoa tastes perfect cooked up in some vegetable broth and served like you would rice. It’s very healthy and it complements meals, and is a great way to soak up sauces. Plattekeis tastes excellent with jam on pumpernickel bread and as a topping to pancakes along with cinnamon brown sugar pears.

I tried to combine the groceries for weeks 1 and 2, so groceries overlap nicely. The mushroom bourgignon is delicious and I’d recommend it served along with garlic bread, or quinoa. While serving it with pasta is fine, it dilutes the lovely sauce. Feel free to sub in different kinds of beans in recipes that call for them. At the end of the month, you might find that you are addicted to falafel (we ate it three times this month!).

In weeks 3 and 4, some groceries from the first part of the month will overlap. Many veggies get used up in other dishes throughout the week (e.g the beets, zucchini, chard). Trust me that you will love the cheese enchiladas recipe (holy heck the chili gravy sauce!). In Belgium, I used large wrap-flour tortillas, cut them in half, and didn’t fry them; I reduced the cheese by half. The onions are killer in the enchiladas.

Finally, since the season of spring is upon us artichokes and asparagus are making appearances at the markets. My favorite way to eat them is freshly steamed with butter. Just trim the spiny thorns off, cut the top off, rub everywhere with lemon and put it in a steamer basket for 15-20 minutes or until totally tender. Then pull the leaves off one by one.

If you end up using this, please let me know how you like it/hate it/want to see changes, or especially if you have recipe recs that you want to see on a future month. Eet smakelijk!

February 1, 2012

February MoMe


Here’s February’s MoMe; (click text to download and print). 

The meal plan has a biweekly grocery list, but I figured I’d just go ahead and try and explain how I use the meal planning, and share some positive unintended outcomes. I go grocery shopping at least once per week, and sometimes more often. I hit up the fresh markets for produce, and grocery stores for most of the rest. I do this because I don’t have a lot of space to store things. I don’t like grocery shopping. It seems like a hassle, it’s time-consuming, and I’m limited to what I can carry back on my bike (saddlebags + backpack), or on foot (grocery cart + backpack + extra bags). I get sidetracked reading labels, navigating the store, waiting in line, forgetting something and having to backtrack - all in all, not much fun. Having a well-planned list forces me to buy things that I need, stick to the list, and become more aware of what I have at home. Of course, I’m currently motivated to try this out and use it, so some of these outcomes are probably biased.

With MoMe, I spend more time planning, preparing, and shopping. It's reduced the amount of time stressing over what to eat so I don't panic and pop in a frozen pizza, and provides ready-made lunches. I’ve been analyzing the food costs more closely, and it’s actually driven down our total food expenditures, without feeling deprived or sticking to a hard budget. For example, I recently bought the following to restock some pantry staples:


3.992 kg dried chickpeas (about 4.4 lbs)
2.592 kg of dried pintos (again about 4.4 lbs)
.89½ kg red lentils (about 1 lb)
1.251 kg raw peanuts (2.2 lbs)
1.30½ kg whole kernel popcorn (about 1 lb)
2.101 kg dried kidney beans (2.2 lbs)
€12.12 Total (or $16.72 in USD)

Canned beans are convenient, but when compared to the cost of buying raw ingredients, raw ones are cheaper.
Soaking and cooking 1 cup of dried beans will double in volume to about 2 and 1/2 cups. This will prepare more food (more servings) than what is going to come out of a 14 oz can of canned beans (4oo g; which when emptied, drained, and rinsed will yield about 1 and 1/4 cups). Vegetarian ingredients (on just a weight basis) tend to be much cheaper than meats. The volume of food obtained from cooking raw beans provides more food than the original amount; the volume of food obtained from cooking raw meats is less than the original amount. In comparison, €12.00 buys around a 1 lb (2.2 kg) of boneless chicken breast, and feeds you much less frequently; although a whole chicken could be purchased and used in many other meals.

Currently, nutritional portion sizes for foods that contain protein are measured out in 1-ounce equivalents. I know, now you're wondering how much protein do I need? Chances are that you probably overeat this macronutrient. Using the term ounce-equivalents is confusing because foods that contain protein all have different values on what makes a serving/portion (I use the word serving and portion size interchangeably), and further no one measures food out this way. For example, 1/4 cup of beans is a 1 ounce-equivalent. If you checked how much you need on the online chart linked just before, you'll see that a grown woman needs around 5-5 1/2 ounce-equivalents; a man 6-6 1/2 ounce-equivalents. Dietitians use .8 g/kg - but let's forget that. If you checked the first link in this paragraph, you will have noticed the following constitutes a 1 ounce-equivalent: 1 egg, 1 ounce of meat, 1 tbsp of peanut butter, 1/2 ounce (1 handful) of nuts, and 1/4 cup of cooked beans (I'm going for simplicity, and I don't feel like including gram measurements for all of that). 

Let's go further and compare what people *actually* eat out of those listed. Egg dishes such as scrambled or omelette dishes usually contain 2-3 eggs per person (can be up to 6 if you eat out) which equals between 3 and 6 ounce-equivalents. Next up, servings of meat at home are often between 3 and 5 oz, or about the size of your palm (at restaurants they are 8-16 oz, like the size of your head) - again keep in mind the ounce-equivalent. Making a peanut butter sandwich, chances are you'll opt for at least 2 tbsps; I didn't even get into other foods that contain proteins: tofu, milk, yogurt, cheese, whole-grain breads and seeds, some vegetables. It's crazy isn't it? You wonder why people are so confused about nutrition and diet. Understanding serving sizes/portion sizes is a steep learning curve, but it's among one of the best tools you can use when cooking and eating. It helps to estimate the amount of food required, it helps maintain your weight, and it ensures you're eating foods healthfully.

So inevitably you want information on the others:
Grains: foods from this group are measured in 1 ounce equivalents. Eat more whole-grain foods and less refined. Each of these is a 1 ounce equivalent: 1 slice of bread, 1 cup of ready-to-eat cereal, or ½ cup of cooked rice, cooked pasta, or cooked cereal, 1, 6” tortilla or roti.
Fruits: foods from this group are measured in cups. The following are servings: 1/2 banana, 1 cup of fresh fruit, 1/2 cup of dried fruit, and 1/2 cup 100% fruit juice. Although fruit juice counts (it shouldn't), it is healthier and recommended to consume whole fruits (fiber, nutrition, reduced spike in blood sugar, etc). Most people need to eat 2 cups of fruits daily.
Vegetables: are also measured in cups. The following measurements count towards 1 serving from the vegetable group:  2 cups raw leafy greens, 1 cup raw or cooked vegetables, and in some cases, 1/2 cup of cooked vegetables (such as cooked greens). Most people need 2-3 cup equivalents of vegetables daily.
As part of the 70% of the rest of the world that doesn't digest lactose, and questions the science behind dairy promotion in nutritional recommendations that should be promoting foods and activities that promote bone health (weight-bearing exercises, calcium, gender, race, Vitamin D and K) I'm with Harvard. They tend to synthesize nutrition information in a useful, no-nonsense practical way.
Fats: there is lots of evidence that supports the use of plant-based oils in cooking and baking, limits the use of butter, and avoids trans fats. Fats play a role in digestion and absorption, help to carry flavor, and contribute to feeling full (among many others).

I digress. Since February is still among the darker months, there are some oven-baked dishes; a creamy penne vodka can be a celebratory dish for Valentine’s day (or do a cheese and chocolate fondue night, or maybe the chickpea piccata). Gin is an acceptable substitute. An excellent aperitif are dirty martinis. I tried to pair dishes together so a meal that takes longer to prepare one evening, can be used in conjunction with the next day’s meal. Make enough pizza dough to cover two evening meals; when cooking rice, double the amount to use the next day. In week 2, the meals have cheese, so round out the week with a hearty bean and veggie chili.

Now, some picas of recipes on this month's MoMe:
DSC_0254
Chickpea piccata [Feb MoMe]. I've tried this with arugula, spinach, and now broccoli. Always delicious.

DSCN0320
Pizza night [Feb MoMe]; My friend Nico's homemade pizzas; I have a lot to learn.

DSC_0447
Baked stuffed tomatoes [Feb MoMe].

Tofu tikka masala kebabs [Feb MoMe]; excellent served over rice or salad.

Pav bhaji in pita with peaches
Pav Bhaji served in pita [Feb MoMe].

Tartiflette
Tartiflette [Feb MoMe].

omg that was a long one wasn't it!? As always if you use this and hate or love it, please leave feedback. Until next month, happy eats y'all. I got my chickpeas soaking.

January 1, 2012

Happy New Year's and Month of Meals


In the spirit of ringing in the new year my resolutions include posting and sharing a years worth of month of meals (MoMe), and catching up on old trip and travel pictures.

MoMe will feature four weeks and five days of evening meals, including prep work to bring your week of meals to the table, and a featured grocery list of things to purchase. This assumes the most basics of basics, and that is having a well-stocked pantry to build your meals. Five meals is a good starting point. Something always comes up. With a bit of pre-planning leftovers from five planned meals is a great starting point. I cook daily. After two years of cooking breakfasts, lunches, and dinners daily, I have found that five meals stretches to cover leftovers without wasting raw ingredients.

I read a lot of food blogs (cookbooks, cooking magazines, and watch cooking TV shows). Some I check daily, others I find by searching for meals. MoMe will feature links to recipes. If you’ve got a good idea, please share it. If you use this, and it helps you become more efficient putting together meals and becoming a better cook, please leave a comment. I love feedback.

Here's January's Month of Meals (download or print here):


May 31, 2010

How to Cook and Prepare Beans and Lentils

Beans! Beans! Are good for your heart
But the more you eat, the more you...have health smarts!


Beans and lentils are healthy types of protein and contain fiber, vitamins, minerals, and phytochemicals - making them something that everyone should eat all the time. Lentils and legumes are quick-cooking and require no soaking, and can often be cooked in as little as 30 minutes. Beans are available dried, canned, and frozen. Frozen and canned beans are all pre-cooked and can be used immediately. Dried beans require soaking and cooking. Once soaked, beans can be cooked on the stove, in a slow cooker or in a pressure cooker.

Lentils and legumes include: red, green, and yellow lentils, split dhals like channa, tuver and masoor dhals, adzuki beans and mung beans.

Dried beans and peas include: black beans, red and white kidney beans, black-eyed peas, pinto beans, navy beans, garbanzo or chickpeas.

How to cook beans, also the soak and cook method:
1 cup of dried beans yields approx. 2 cups of cooked beans, or enough for 4 people.
  1. Place 1 cup dried beans in a large bowl and cover with a quart of water. Let soak overnight, or at least 6 hours. 
  2. When ready to cook, drain the soaking water and rinse beans with fresh water.  In general, soaking hydrates the beans and makes the complex starches within the beans available. Rinsing soaked beans and draining off the soaking water reduces the raffinose sugars that can cause gas.  Some methods include saving the soaking water due to nutritional content. Save the water or bean broth, once you've cooked the beans - as most of the nutrition is in the bean and some may be found in the bean broth water (after it's been cooked). 
  3. In a large stockpot (such as 4 qt stock pot) add rinsed beans and 2-3 quarts of water. 
  4. Bring to a boil, then reduce heat to a simmer and cover slightly. Cook for 45-60 minutes, testing beans to see if they are soft enough.  
  5. Once cooked you can add them into your recipe, or store them, with their broth either in the freezer or fridge. Cooked beans in broth will last up to a week in the fridge; cooked beans without broth will last a few days. 
How to cook lentils:
1 cup of dried lentils will yield approx. 2 cups of cooked lentils, enough to serve at least 4 people.
  1. Rinse 1 cup lentils to get rid of any duds or grit, then add lentils to a large stockpot (such as a 4 qt stockpot) with 2 quarts of water. 
  2. Bring to a boil, then reduce heat to a simmer and cover slightly. Cook 25-30 minutes. 
  3. Once cooked you can add them into your recipe, or store them, in an airtight container in the fridge or freezer.  Cooked lentils with broth will keep for 1 week in the fridge, and for a few days without broth.
Notes: because lentils take much less time to cook they are ideal additions to soups, because you don't have to add much extra water to cook them.  

Asafoetida powder can be added to the cooking water when cooking beans and lentils and is thought to help make the beans and lentils more digestible (e.g gas reducing).

Bean broth can be used just like vegetable broth in any other dish you are cooking.  I toss in a bay leaf while cooking beans to season the broth and it gives the kitchen a very nice aroma. 


October 9, 2009

How to Cook Tofu


I think tofu can be tricky to cook with sometimes. Here are a few basics: I have been most successful using a high-quality extra-firm tofu that has been processed with calcium sulfate (increases the calcium content). I like to "quick drain" the tofu to help expel the water out of it, so that it can pick up the flavors or seasonings of the dish you are trying to create.

Quick-drain: drain water from package, and wrap tofu in light cloth or paper towels. Squeeze or press gently to expel water and let sit in a colander for up to 10 minutes. Place a heavy object on top of tofu (but don't smash it), like a cutting board with a glass or plate on top of it.

Here are the different types of tofu and what they can be used for:

Silken-Style
extremely "silky"
used in blending, smoothies, frosting, miso soup etc
Breaks apart easily, not recommended for stir-frying

Soft Tofu
Can be used steamed, in soups, breaks apart very easily
Can be scrambled like "eggs" or tofu scramble

Firm
Can be used in stir-frys or soups
Holds together better than soft styles

Extra-firm
Best used in stir-frys, grilling, baking, roasting and bbq-ing.
Holds together well; can be frozen, then thawed for chewier, meatier consistency.


This recipe is ubiquitous-it can be used to top pasta, salads, added to fajitas, enchiladas, or anything you can dream up.

Basic soy-cumin pan-roasted tofu

1 package extra-firm tofu, quick-drained and cubed into 1-2" cubes
1/4 cup peanut oil, divided
1-2 tsp cumin
1-2 tbsp low-sodium soy sauce
Directions
1. Heat half of the peanut oil over medium-high heat in cast iron skillet or large saute pan. Tofu soaks up the oil, but it also has a high water content and this amount really browns the tofu without it sticking to the pan. Peanut oil can be heated to a higher temperature than olive oil without smoking.
2. Once oil is hot, spread tofu out in even layer and allow to simmer and brown until golden along edges. The tofu will crackle and begin to sizzle. It will turn yellow to golden to golden brown (usually about 10-12 minutes).
3. Sprinkle 1/2 tsp cumin on top of tofu once even in color. Flip tofu over and continue cooking on other side. You can add the rest of the peanut oil.
4. Sprinkle with cumin again and turn once more.
5. When both sides of the tofu are golden-brown. Add about 1-2 tbsp of low-sodium soy sauce, it will smoke slightly then evaporate.

Turn heat off and serve alongside any dish.

Note: If you don't quick drain the tofu, the water comes out during the cooking process and it will be harder for the tofu to brown. It will, in effect, stay soggy. You can do the same thing with any marinated tofu also. Or throw it on the grill. The extra fat helps the tofu to not stick to the grill or saute pan or baking dish

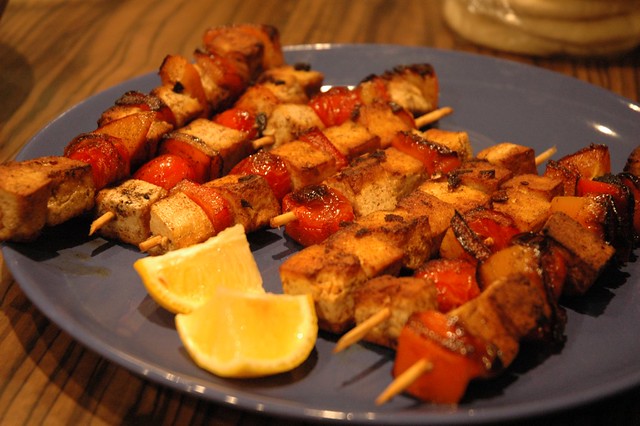
Marinated Tofu (in this case BBQ-tofu a la Tex-Mex style)
1 cup or more prepared chipotle bbq sauce
1 package extra-firm tofu, quick-drained and cubed
1-2 tsp olive oil
1/2 cup white onion, chopped and diced
1-2 cloves, garlic, smashed
Directions:
1. Heat oven to 400 F
2. In a large mixing bowl, mix together bbq sauce, olive oil, onion and garlic.
3. Fold in tofu cubes, being careful not to break the pieces
4. Spray baking dish with cooking spray.
5. Place tofu mixture on baking dish, cover with foil and bake for 35-45 minutes. Stir and rotate for even cooking. This method allows you to forget about what is baking, and go on and do other things. Alternatively, you could broil over high heat for 10-12 minutes, checking every few minutes to rotate the tofu for a nice even golden broil.

(you could also make an Italian style baked or broiled tofu with a balsamic vinegar, some Bragg's liquid aminos and some fresh rosemary, cooked the same way.)

September 21, 2009

Hot Sauced Glazed Tofu

Know anyone that hates tofu much? Loves tofu much? This tofu recipe is the answer to both responses. Make it whenever you want to introduce or serve tofu to someone that you know. This recipe is from Isa Chandra Moskowitz and Terry Hope Romero's cookbook(s) Veganomicon and from their cooking website the Post Punk Kitchen.

They have 2 cookbooks (and looks like one more about brunches) that are great books for any vegan, vegetarian or omnivorous diet. Their cooking takes some innovative skills in the kitchen, but their recipes are very good and fun to make, and above all creative and daring.

Hot Sauce Glazed Tempeh
or page 129

***I didn't have a few essentials from the recipe so here is my khavanu'd version below. If you want their exact directions purchase their cookbook, visit their site, borrow from a friend or library***


Ingredients
1 Package extra-firm tofu drained and pressed (or tempeh if you have)
1/2 cup wine (I used a chardonnay - they say use whatever you have)
1/4 cup hot sauce
2 T olive oil
2 T Bragg's or soy sauce
Juice of 1 lemon
2 cloves garlic, crushed (I used 2 T ginger-garlic paste instead)
1 tsp cumin
1/2 tsp oregano (used 1 heaping teaspoon)
1/8 tsp cayenne (they swear by this, and I thought through nostrils burning, that it was a crazy recommendation, but now I'm blogging this so there)

Directions:
1. Drain and press tofu
2. Meanwhile, mix together wine through cayenne in a large mixing bowl.
3. Cube tofu in 1" cubes and put in the mixing bowl with the marinade.
4. Set oven to broil.
5. Get a ceramic or glass oven proof casserole pan and lightly coat with cooking spray.
6. Turn tofu and marinade into casserole pan and place in oven.
7. Check tofu and marinade, turning every 5-10 minutes. This should take about 20 minutes. Check often to prevent burning. It is done when the tofu is nice and chewy with a small remainder of the marinade in the pan. It will reduce and thicken into a wonderful sauce.

Serve over rice, a salad, as a main course. I served with fresh corn on the cob (coated with lime, cumin and salt) and some stir-fried peppers, summer squash and basil.

Cheers!

June 4, 2009

Anyone Can Cook

Happy Cooking Resources
My criteria for utilizing cookbooks includes how often I can flip a cookbook open and find something quick, simple, nutritious, and seasonal. Recipes and prep work should be intuitive and straightforward, and involve common kitchen tools and gadgets. The quality of a cookbook is directly proportional to the training of the author. Chefs and cooks with culinary backgrounds (with an approach to daily cooking in a home kitchen) tend to have great skills and tips that turn out a solid dish time and time again.

These are some of my favorites that I've accumulated over several years that truly never fail me. And as a cook, not a chef, that is supreme.

1. Deborah Madison's: Vegetarian Cooking for Everyone
Simply a best buy: intuitive, smart, straightforward and utilizes common whole foods. Madison's book is a go-to book time and time again. It is like a glossary, encyclopedia, and fine recipe collection in one book. Divided into several sections, the inside covers include definitions, oven temperatures, and commonly used ingredients. There is an entire section devoted to the preparation and introduction to vegetables A-Z. Madison is not condescending in her choices for writing a vegetarian cookbook, she presents these as solid recipes that can stand on their own, and invites the reader (novice cook or experienced) to take her word for it. Madison was all about local and seasonal foods long before the local slow foods movement hit the US. She is an inspiration and her approach to cooking, diet and food is built around consuming whole unprocessed foods with enjoyment.
Her recipes and approach make sense because if you cook everyday and consume meals at home and with friends and family most of the time, there is really no need to focus on low-fat ingredients and substitutes. So much of our intake is surrounded by elimination, reduction, or maximization (fat-free, diet, low-sodium, natural, contains whole grains, contains 7 vitamins and minerals) we refuse celebrating foods and food traditions or we feel guilty for their preparation techniques because so much of our intake is outsourced, but we feel little rage at consuming so many meals away from home, and out of our control. So, sorry for the rant, but I would recommend this book if you are interested in celebrating the culture of just having an excellent food culture.

2. Angela Shelf Medearis's The Ethnic Vegetarian
I wish this cookbook had pictures. If she every publishes this cookbook with photos, I will happily re-purchase. If you like and appreciate any types of ethnic cooking - buy, borrow, or check-out (from the library) this great cookbook. It contains recipes of traditional and modern African-American recipes from Africa, America, and the Caribbean. It is simply one of the best ever cookbooks (thanks ehcov!). Here is a list of how the cookbook is divided:
  • African Vegetarian Recipes
  • Afro-Carribbean Vegetarian Recipes
  • African and Native American Vegetarian Recipes
  • Creole and Cajun Vegetarian Recipes
  • Southern Vegetarian Recipes
  • Modern African-American Vegetarian Recipes
  • Menus
The Senegalese Tofu and Yellow Rice are on a near weekly rotation. But here are some of my other favorites:
African-Style Curry Powder, Jerk Seasoning, Sierra Leone Jollof Rice, Okra and Corn Etouffee, Dirty Rice, North Carolina Collard Soup, Cheese Grits, Hopping John, Soul Sushi, and Bean Burgers.

3. Mahanandi Food Blog online here: http://www.nandyala.org/mahanandi/
Mahanandi's or Indira's photography skills make her recipes jump off the page. The majority of her posts were written while living in/near Seattle or the Pacific Northwest and she has recently relocated to the Houston area. She brings enthusiasm and culture to the cooking blogosphere by highlighting traditional Indian (south?) foods and showcasing North American foods. Her hybridization of east meets west produces amazing recipes and photos. If you visit the link I posted here, it will take you to her original website, with a link and post to her new website. Both are lovely and I'm happy to see her many new posts. Ingredients are easily searchable and organized, she reviews cookbooks on their ease of use and their authenticity, and features many family and friends artwork, gifts, or comments. She is a gifted cook and I feel lucky that I stumbled upon her website 2 years ago.

4. Good Eats by Alton Brown (Food TV)
In college as part of the bachelor's degree in Human Nutrition and Foods, required coursework were 2 semesters of Food Science with accompanying labs. The once per week, 3 hour lab began with a quiz and a TV show, uh, Food TV's Good Eats. Six years ago, I had little patience to view TV during lab and felt that it was a waste of tuition money. Regardless of how I felt then, Good Eats taps into one huge thing: Food Science. I felt that it was in important reason to feature it on this post. Food Science is essentially the chemical and physical properties of any food or liquid. The classes and labs taught food chemistry, food science, and essentially cooking.

We learned anything and everything. Our coursework referenced Food TV (Good Eats) and Cook's Illustrated. More importantly the coursework focused on measuring techniques, heating and equipment, food selection and sensory evaluation, food microbiology and safety, and mixing techniques. We learned about carbohydrates in food, starches and sauces, flours and flour mixtures (baking, mixing, etc) - lessons focused on proteins in food (basically how to prepare meat, poultry, fish and dried beans) to properties of milk, cheese and eggs. In the labs we carried out experiments in fermentation where we brewed a lager beer and an ale; preservation where we canned & pickled vegetables (refrigerator pickles) to slicing, dicing and chopping with correct knife techniques that we learned online and in the lab kitchens to blanching, marinating and breading anything that grows under the sun.

I am continuously impressed with Alton Brown's Good Eats show topics and production. Alton Brown is a food science guru. He explores the literal side of cooking with its associated food science and is ingenuous in presenting topics to a TV audience.


January 30, 2009

Quick Eats

I love home-cooked food.
Much more so than heading out to grab a quick bite. If you grocery shop often enough and keep pantry staples it's easy enough to throw quick meals together. This kind of thinking gets lost mid-semester, but cooking is relaxing and creative, and can be really nourishing. My grocery list is usually made up of perishables from most of the 5-6 food groups (fruits, vegetables, grains, beans, calcium-rich foods, and fats). Pantry staples are life-savers:
  • grains: whole-wheat pastas, rices (basmati, brown, quick-cooking, arborio, jasmine), couscous, barley, quinoa, oats
  • fruits and veg: dried, frozen, and canned goods are always on hand to throw in. Things like dried mushrooms and sun-dried tomatoes are also good to have on hand. I always have cans of canned and diced tomatoes (low-sodium varieties) available.
  • beans and proteins: canned, dried, and frozen, soy foods, and frozen soy foods (veg links, and patties), nuts, nut butters.
  • calcium-rich foods: fortified soymilks, regular milk, parmesan cheese, or other specialty cheeses, silken tofu, miso paste.
  • Spices and herbs: cumin, turmeric, saffron, black pepper, red pepper flakes, chili powder, any variety of dried herbs, mustard seeds, cumin seeds, coriander seeds, caraway seeds, celery seed, garam masala, and any others you love or cook with.
  • Others: oils such as olive oil, peanut oil, canola oil, and toasted sesame oil, vinegars like red wine, balsamic, white wine, and cider vinegars, chutneys, dips, green and black olives, bottled marinara sauces, frozen semi-healthy prepared foods (like frozen spring rolls or gyoza, veggie patties), vegetable broth, beer and wine, coconut milk, thai curry paste, fruit jams, and lemon custard.
This recipe was thrown together with mostly pantry goods and a few items I bought on my bi-weekly grocery store trek. It took me about 35 minutes. I get the rice going first so as it cooks, and you start on the main thing, the rice is ready when you are.

Thai Veg Curry
Serves: 4

4 cups Jasmine rice, cooked
4 shittake mushrooms, rehydrated from dried
2 T ready-made Thai Green Curry paste (from Harris Teeter)
1.5 cans (14 oz or 16 oz) coconut milk. (you pick the fat content - fat carries flavor)
1 t peanut oil
1 t coriander
1 cup, carrots, cut into matchsticks
1/2 medium sized butternut squash, 1" dice
1.5 cups extra-firm tofu, thawed from freezer, 1" cubes
1/3 cup cilantro, chopped
1 small can bamboo shoots, rinsed and drained (like the size of a small tuna can)
2 T brown sugar
salt to taste
2 T lime juice or fish sauce
1 T tamarind paste
6-7 peanuts, crushed

Note: to rehydrate dried mushrooms, rinse, and then place in boiling water, you can use the water as a stock if you like.

In this recipe several of the ingredients come right out of the pantry. The fresh vegetables that are added to it could be any stir-fry vegetables that you have on hand or like. I would avoid cruciferous vegetables (broccoli, cabbages, brussel sprouts) because they give off a funny odor when cooked into a curry like this one. I usually just buy whatever is in season, or whatever appeals to me that day.

1. Cook rice according to package directions.
2. If using dried mushrooms, rehydrate (they usually take about 30 minutes to soften).
3. Heat oil in a large pot over medium heat
4. Combine coconut milk with curry paste, mix well and add to pot. Continue cooking over medium heat.
5. Next add in butternut squash, and cook about 7 minutes, add in carrots, tofu, and continue cooking about 5-7 more minutes more.
6. Stir in brown sugar through tamarind paste.
7. Stir in bamboo shoots, shittake mushrooms, and cilantro

Serve over jasmine rice, and garnish with some chopped peanuts. I served these with some vegetarian gyoza with soy-sesame oil, and dried chives


January 29, 2009

Kitchen Basics for Easy Cooking

A well-organized kitchen can help you cook more efficiently by simply knowing where things are located. Take a visual map of your kitchen. Are cooking utensils and pot holders near a cooking range? Do you know what’s inside your pantry? Are mixing bowls and measuring cups easy to locate? Re-thinking your kitchen workspace can save you precious minutes in recipe prep.

Here are a few organizational tips that are tried and true.
1. Be smart about storage space. Cabinets can store dishes, cups and bowls. They can also store foods that you cook with often. Keep like ingredients together. Canned beans, tomatoes and vegetables can be organized together. Dried pastas and beans can be stored near each other. Spices can be alphabetized for convenience. If you have pantry space, try to keep daily items (pasta sauce, rice, flours) at eye-level. Keep a wipe-off board or chalkboard to keep track of what you need to replace.

2. Use your countertops. Store daily items on the counter. This will ensure that you use them and save time in the morning. The toaster, can opener, blender, and food processor will be ready when you use them and you don’t have to find storage space. Daily food items can also be stored in attractive containers. Beans or pastas in canisters, bread in a bread box, fruit in a fruit bowl.

3. Eliminate junky drawers. Plastic or wood organizers make silverware and kitchen gadgets easy to find all the time. Cooking or baking cooking utensils can be stored in a canister or drawer next to the stovetop.

4. First in, first out. Try to use items in the order they were bought. This common sense skill will save many foods from spoiling, re-buying the same foods, or creating multiple containers of the same food. Refrigerators can store a large amount of food. Take advantage of pre-organized areas in the fridge: produce drawers, meat and cheese drawers, butter and margarine drawers and side-door storage. Keep frequently used items in areas that are easy to reach. You may want to separate your fridge into four or more areas: beverages, dairy, proteins, produce and leftovers. Try to use items in the order they were bought, first in, first out.

5. Clean it up. Wipe down counters, stovetops and tabletops daily. This helps keep your kitchen in working order the rest of the week.

January 15, 2009

Bon Appetit!

I just got back from a Washington DC visit where I was able to check out some of the Smithsonian museums at the mall. At the Museum of American History, their is a replica of Julia Child's kitchen with many other replicas (wine cellar list, tools, recipes, handwritten notes) with a looping DVD of some of her cooking shows. It was my favorite exhibit if simply to remind me that food is at the center of almost everything we do (as in hopefully we all eat at some point during the day). Yet food and cooking is slowly becoming a lost art, be it scheduling conflicts, lack of interest, or lack of skill. Yet, cooking is worth it!

The kitchen replica was practical, where pots and pans were next to the stove and oven; pegboards hung many kitchen tools and gadgets, and were in easy reach of whatever kitchen task was being performed. Maple counters made chopping and cutting an easy experience, while steel countertops next to the the stove made it easy to move hot things in and out. It was light and airy (sounds stupid, i know) but overall a welcoming place to be. It got me thinking about small things that can be done to make cooking easier and a much more pleasant experience.

While I love cooking, I never gave it much thought in how you set up a kitchen to streamline the entire process. Placement of food items in the fridge and cupboards matter, counterspace matters, garbage location matters, and location of hot pads and oven mitts matters.

Personally, I've taught a number of cooking classes, and have never stopped to talk about kitchen set-up. I can spit out grocery shopping techniques, budgeting techniques, and food prep/meal planning. Julia Child was a huge inspiration and gift to American culinary culture and history. She made cooking and drinking accessible, easy, practical, and fun.

My next few posts will be dedicated to setting up a kitchen to make it an easier, more accessible experience. Bon Appetit!